
Index
- Before You Start
- Things To Keep In Mind
- Method Highlights
- Difficulty Level
- Time Required
- Downloads
- Initial Setup
- Sign Spike
- Install Spike
- Re-sign Spike
- Update Spike
- Register Additional Devices
- Check Spike’s Expiration
- Create A Virtual Mac Environment
- Troubleshooting
Before You Start
- Important: This manual or parts of it may no longer be up to date and will be revised. In the meantime, the Facebook group should be used as a source of information. Thanks for your understanding.
Things To Keep In Mind
- When installing Spike using your own certificate, Spike will stop working if/when the certificate expires.
- To avoid Spike from stopping to work, your certificate needs to be renewed/re-signed before it expires. Always use the same Apple account between re-signs in order to keep all your data & settings.
- When signing Spike using a free regular Apple iCloud/App Store account, your certificate will last for 7 days. When doing it using a paid Apple Developer account, the certificate will last 1 year.
- If you still have an old version of Spike installed on your iOS device and want to migrate all your data and settings, please follow this guide first and then come back here.
- Read this guide all the way to the end. It contains important information, including how and when to correctly re-sign Spike to avoid expiration. This will ensure your Spike app will run without any downtime.
- If you experience any issues be sure to read the Troubleshooting section. If the solution is not there you should join our Facebook group.
Method Highlights
- A Mac is required to install and re-sign Spike. If you don’t own a Mac you can install a virtual environment as explained here. A virtual Mac environment can be installed under Windows and Linux effectively making this method work on all operating systems.
- Spike needs to be re-signed before it expires. This can be done in about 1 minute by connecting your device to your PC using a USB cable and re-signing/re-installing Spike.
- Paid Apple Developer accounts will have all Spike features available when using this method.
- Free Apple iCloud/App Store accounts will have all features except iCloud database backups/restores. You can still backup/restore your database by sending a copy to your e-mail address (Spike Settings > Maintenance > Database Backup/Restore > Send Database) and restoring by sending the database file from your e-mail to Spike, by using the Files app on your device (iOS 11+) or by connecting your device to a computer and using iTunes File Sharing.
This is the recommended method for the more tech savvy users that want to have access to as much Spike features as possible.
Difficulty Level
- Medium.
Time Required
- Initial setup will take about 10 minutes.
- Subsequent re-signs will take between 1 to 2 minutes.
Downloads
- Spike Re-Signer (Required):
- Xcode 9 Or Above (Required)
- Spike (Optional)
- Spike for iPhone/iPodTouch (Latest Version)
- Spike for iPad (Latest Version)
Initial Setup
First we’re going to work on the initial setup. This is something you’ll just need to do once. Afterwards, subsequent Spike re-signs should take you between 1 to 2 minutes to complete.
Make sure you have Xcode 9 or later installed on your Mac. If not, a link to download Xcode is available in the Downloads section.
Now that Xcode is installed and ready to go, please download Spike Re-Signer. It’s available in the Downloads section. You can save it anywhere on your Mac. We will use the Downloads folder as an example in this guide.
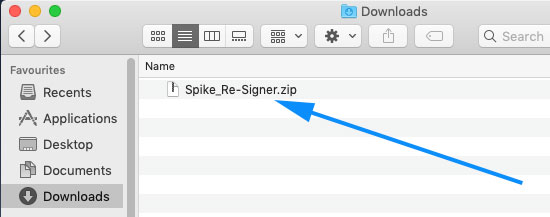
Looking at your Downloads folder you should now have a zip file with Spike Re-Signer or a folder. If you used Safari to download Spike Re-Signer, you should have a folder as Safari automatically extracts downloaded zip files. If you used any other browser you’ll have to extract the zip file manually. Let’s assume you have a zip file like shown in the picture below. Double click the zip file to extract it.
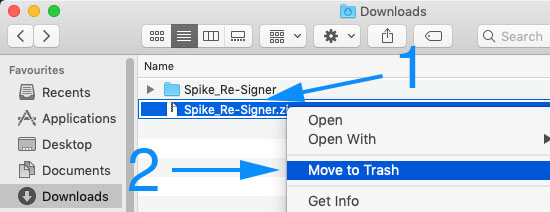
You can now move the zip file to the trash. We won’t need it anymore.
Go inside Spike Re-signer’s folder.
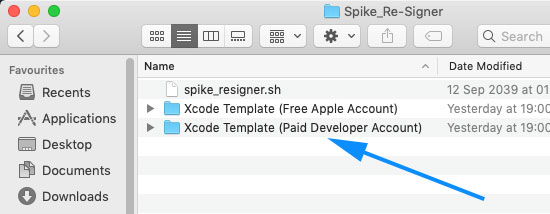
Depending on your Apple account type (Free iCloud/App Store vs Paid Developer) and what Spike version you want to install (iPhone vs iPad) please open the corresponding Xcode project. In this guide we will use the Paid Developer version but all steps are exactly the same for free accounts except a minor nuance that will be pointed out later on.
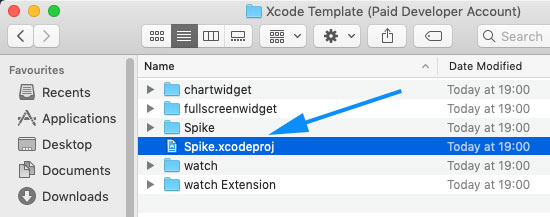
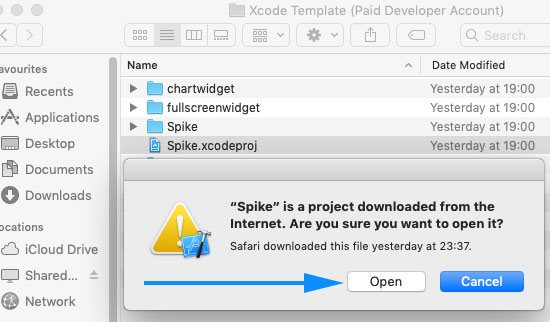
Double click the project file to open Xcode.
If your Mac complains that this Xcode project was downloaded from the internet just press Open.
The first thing you want to do is connect your device to your computer via USB. If you have an Apple Watch make sure it’s synced to your device before connecting it to the USB cable. Now select your device (and Apple Watch if applicable) in Xcode. This will allow Xcode to associate your device(s) to your Apple Account so you’re able to run Spike on it (them). If at any point Xcode asks you if you want to add the device(s) to your account just say yes. Leave your device(s) selected in Xcode during the remaining of the guide.
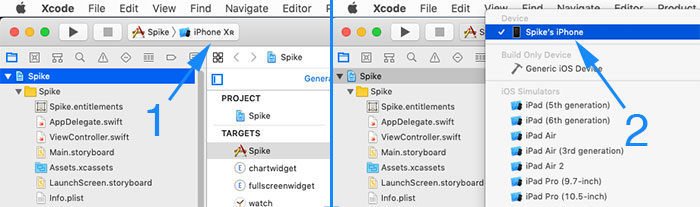
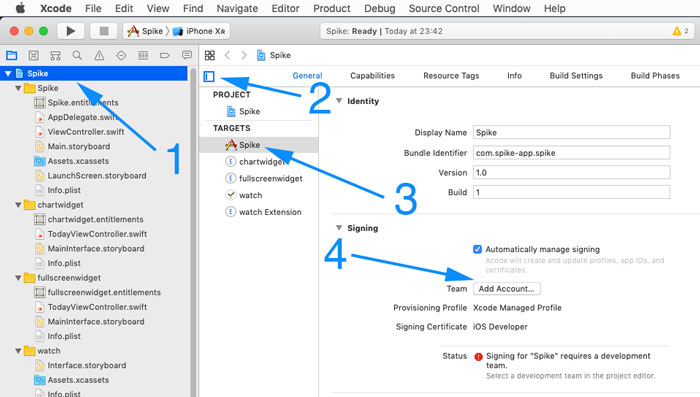
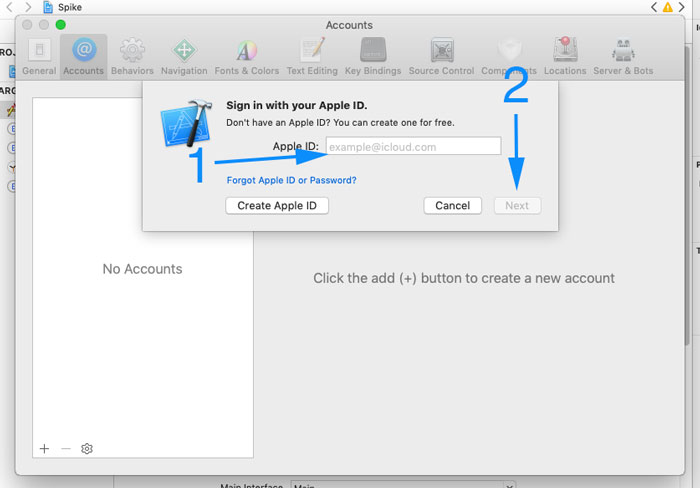
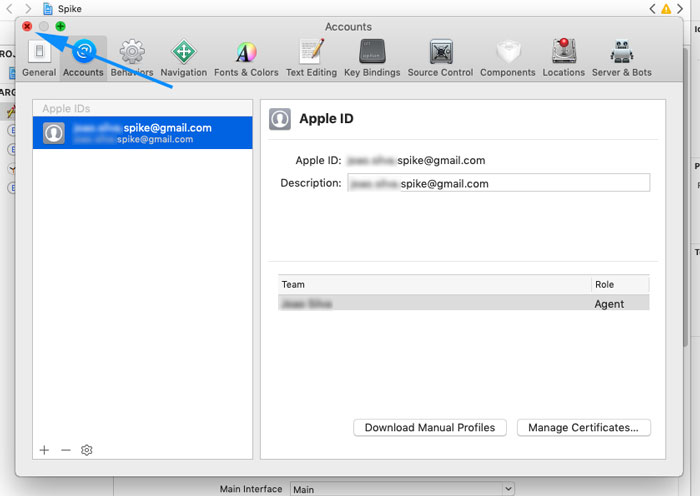
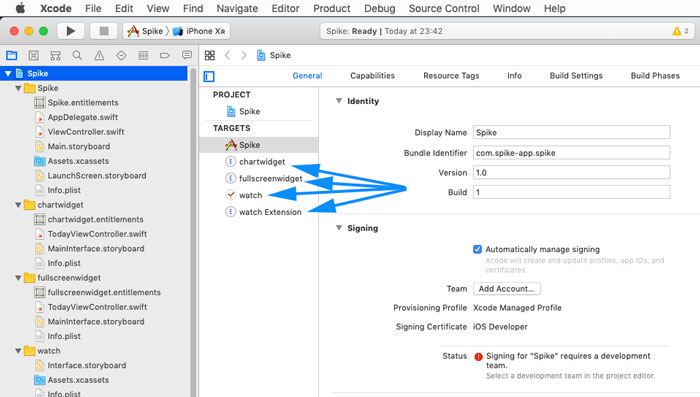
Now make sure you select Spike from the Project Navigator (1), the Project and Targets List view is activated (2) and the Spike target is selected (3). If you still haven’t added any Apple account to Xcode please press the Add Account button (4), otherwise ignore the next 2 steps.
After pressing the Add Account button a popup will appear. Please insert your account credentials. Xcode accepts both free and paid accounts. Because we’re using the paid Xcode template we’ll add a paid account.
After you’ve logged in close the popup to return to your Xcode workspace.
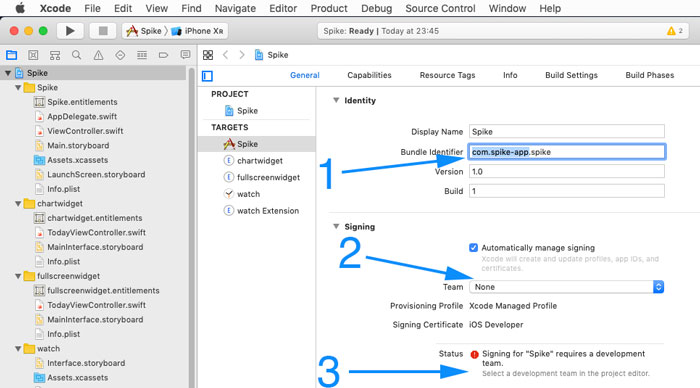
Change the “com.spike-app” part of the bundle identifier to something else (1). Change ONLY the “com.spike-app” and leave the rest intact “.spike”. Normally a reverse domain is used. You can, for instance, change the “com.spike-app” part to net.peterbaker or com.silviawhite or org.superdiabetic, etc. Change it to whatever you want as long as it’s unique and not used by anyone else. Let’s assume you chose org.imnotwaiting then the complete bundle id should be org.imnotwaiting.spike
After you’ve changed the bundle id select your account under the Team section (2).
If anything goes wrong look at the status section (3). A suggestion or button will appear that you can use to fix any issues.
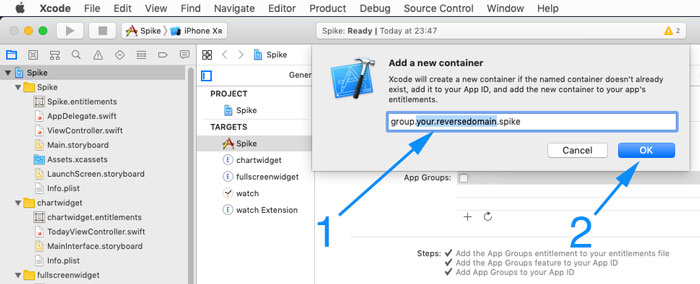
Now go to the Capabilities tab (1) and then press the + button (2) in the App Groups section to add a new entry for Spike.

As shown in the picture, the new app group entry should be named group. + the same bundle identifier you chose in the previous step. So, for the org.imnotwaiting.spike bundle id, the app group should be called group.org.imnotwaiting.spike
This naming convention is not mandatory, in reality you could write whatever you want but lets try to keep it as standard as possible.
When you’re done, just press the OK button.
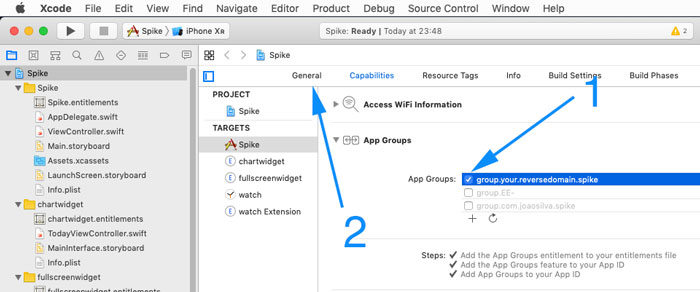
Make sure the newly created app group is selected (1).
Scroll all the way down the Capabilities tab and make sure all entries in the HealthKit and iCloud section are blue (don’t change any of the settings). If you see any red errors, Xcode will also show you a Fix It button. Make sure you use it. The goal is to have everything blue. Free accounts will not have the iCloud section enabled, only HealthKit and App Groups.
When you’re done go back to the General tab (2).
Now do the same for the remaining targets (chartwidget, fullscreenwidget, watch & watch extension). In each of these 4 targets, go to the General tab and change the “com.spike-app” part (ONLY that part) of their bundle identifier to the same reverse domain you chose for the Spike target. Let’s use the org.imnotwaiting reverse domain as an example. The chartwidget bundle id should then be org.imnotwaiting.spike.widget, the fullscreenwidget should be org.imnotwaiting.spike.fswidget, etc. You’ll also need to select your Apple account in the Team section. Do this for all 4 targets. For each of these targets you also need to go to the Capabilities tab and under App Groups make sure you select the same app group you created before. You don’t need to (and must not) create another app group for each target, use (select) the same app group you previously added to the Spike target. These remaining 4 targets only have App Groups enabled under their capabilities so there’s no need to check HealthKit and iCloud for them.
When you’re done modifying all the remaining groups you can close Xcode. Your initial setup is done and you won’t need to redo any of these steps anymore. Please keep this Xcode project always, although no more modifications are granted we will still need this project in subsequent Spike re-signs.
Under the hood, Xcode has been communicating with Apple’s Signing Servers and has setup all certificates and mobile provisioning files without us having to login to Apple’s Developer Portal and do it all manually. We can now begin signing Spike.
Sign Spike
Now that the initial Xcode setup is taken care of and all certificates and provisioning files are configured in your mac we can focus in actually signing Spike.
To do this we will use our custom made Spike Re-Signer bash script. We will need to use Terminal for this. If you’re not a tech savvy person don’t be scared about using Terminal, we made the Spike Re-Signer script extremely simple to use and doesn’t require any custom commands.
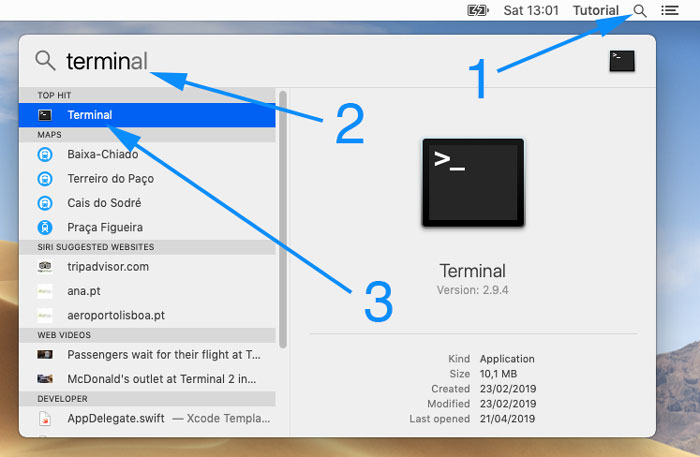
Open Terminal on your Mac. If you’re not familiar with using Terminal an easy way to get to it is by searching for “terminal” using Spotlight.
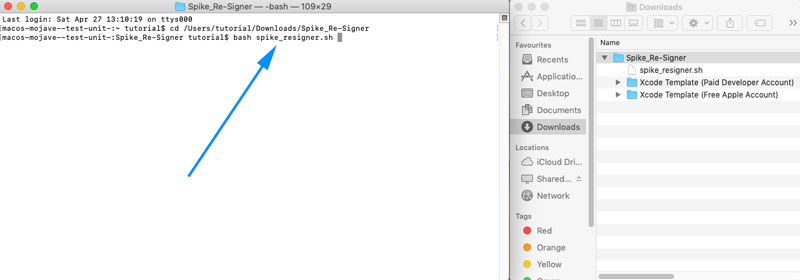
Make sure you have Finder open and pointing to the Downloads folder (where you downloaded Spike Re-Signer) next to the Terminal window. Now, in the terminal, write “cd ” (no quotes and note the SPACE after cd) and then drag & drop the Spike Re-Signer folder from finder into terminal, next to “cd “.
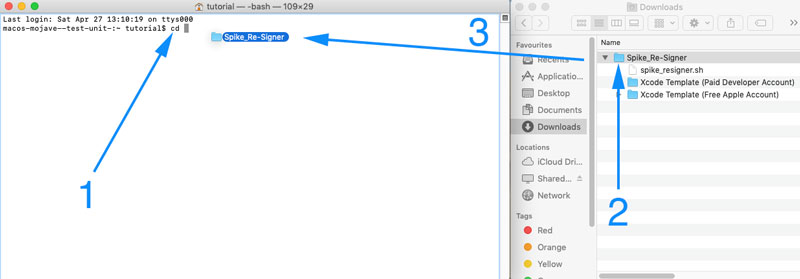
If all goes well your terminal window should now look similar to this: “cd ” + path to your Spike Re-Signer folder.
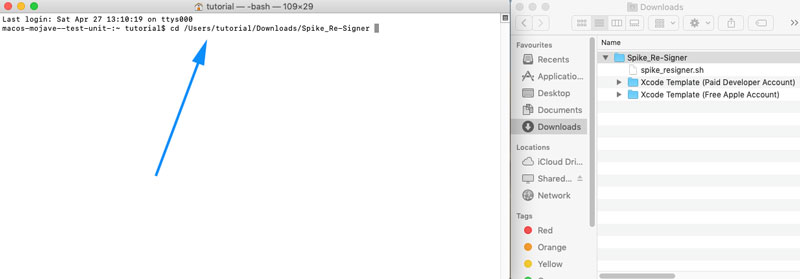
Press ENTER on your keyboard to send the command to terminal and now write “bash spike_resigner.sh” (no quotes).
Now press ENTER on your keyboard. This will execute the Spike Re-Signer script. Make sure the terminal window is big enough to fit all characters, like shown in the image below.
If, while signing Spike, you get a permission denied error in terminal, redo the same steps but this time prepend the sudo command when executing the re-signer. To clarify, the previous “bash spike_resigner.sh” command should be changed to “sudo bash spike_resigner.sh”. Afterwards, you’ll be asked for your Mac password. Sudo is needed when your Mac user has limited permissions and, if that’s the case, should always be used from now on.
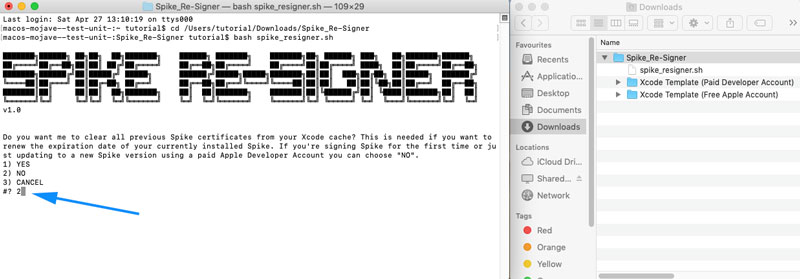
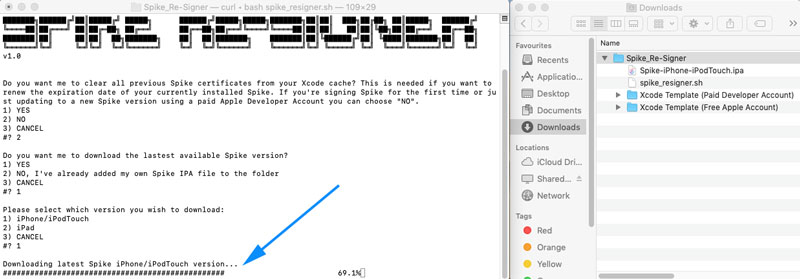
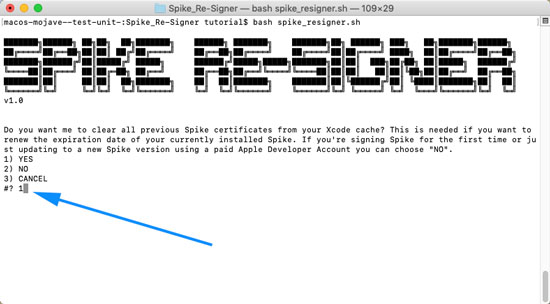
The Re-Signer will ask you a few questions before re-signing Spike. The first question asks if you want to clear all previous certificates from Xcode’s cache. Every time you re-sign Spike to extend its expiration date or every time you re-sign a new Spike update with a free account you NEED to clear the Xcode cache. If you’re signing Spike for the first time (like we’re doing now) or if you’re re-signing a new Spike update with a paid Apple Developer account you DON’T need to clear the Xcode cache. With free accounts, every time you clear the cache and re-open Xcode it will re-download all certificates with a fresh expiration date, this is how you extend Spike. With a paid account it doesn’t matter much, you should only do it when you renew your membership with Apple.
Because we’re signing Spike for the first time and we’ve just created our certificates in Xcode we’re going to select NO by writing 2 and then pressing ENTER.
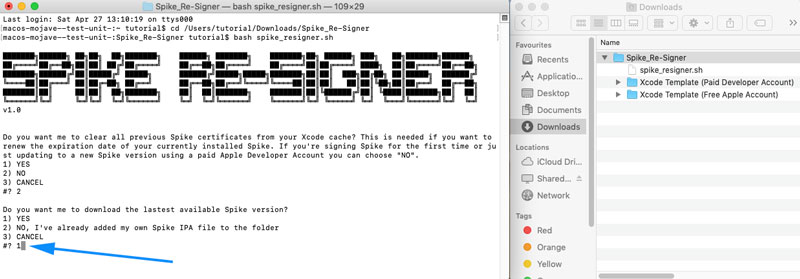
The Re-Signer will now ask us if we want to download the latest Spike directly from Spike’s web server. This will always ensure we’re signing the latest available Spike version. If you don’t have an active internet connection or you want to re-sign an old Spike version you can select NO and the script will then look for all IPA files that reside in the same folder and will list them so you can choose which one you want to sign. For now, we’re going to select YES and allow it to download Spike automatically. Write 1 and then press ENTER on your keyboard.
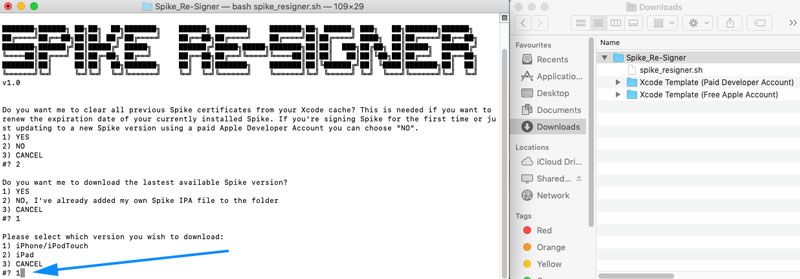
It will now ask you which Spike version you want to download and re-sign (iPhone vs iPad). Choose your version and then press ENTER on your keyboard.
The download should now begin. Spike’s ipa file is about 50mb. Depending on your internet connection, this step can take a few seconds or a few minutes.
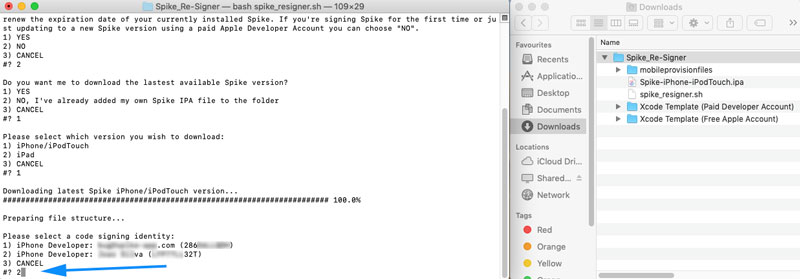
The last step is to select the code signing identity you want to use to re-sign Spike. This is the same Apple account you used in the Spike Xcode project you’ve setup up previously. Write the corresponding number and then press ENTER on your keyboard.
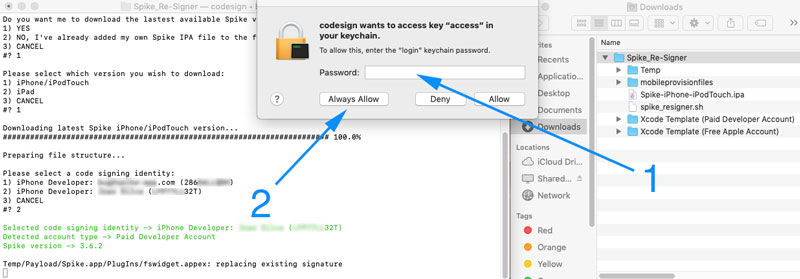
If this is the first time you sign an ipa file using terminal you will be prompted to allow Apple’s Codesign utility access to your keychain so it can correctly fetch your signing certificates and embedded them in Spike’s ipa file. Just write your Mac password and then press the Always Allow button.
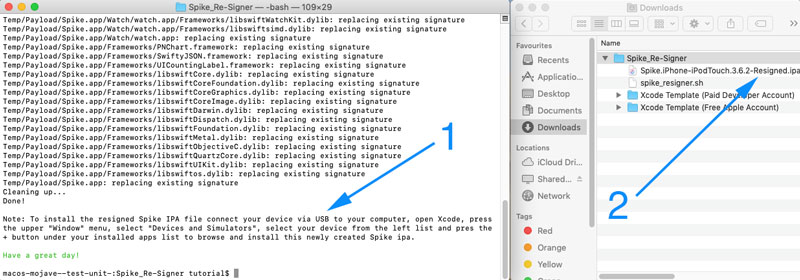
The re-signing process will now begin. This should take less than 30 seconds to complete.
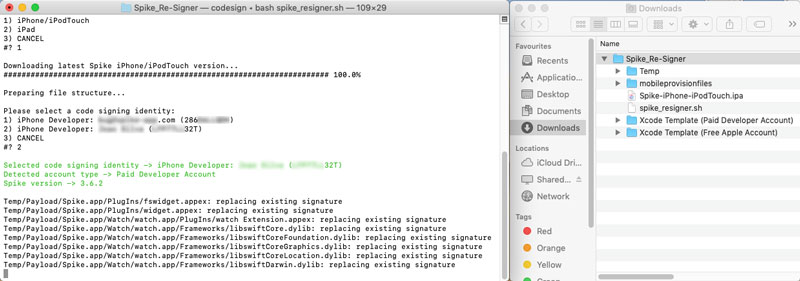
Once the process is completed you will be presented with brief instructions on how to install Spike (1). You’ll also notice that you have a new ipa file inside the Re-Signer’s folder. That’s your custom signed Spike copy (2).
Install Spike
Now that you have a custom Spike ipa file signed with your own Apple account (free or paid) it’s time to install it on your device.
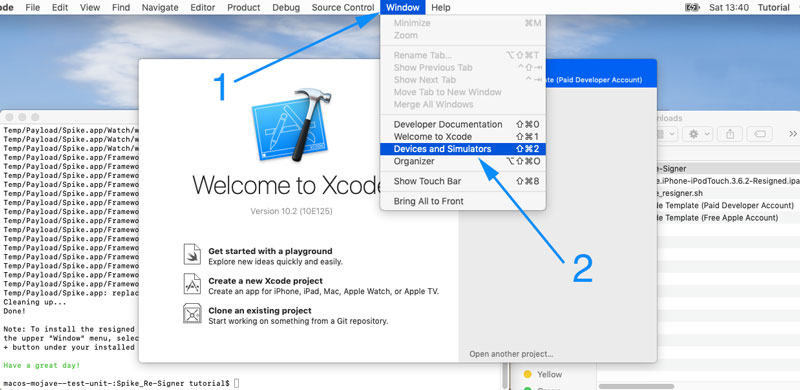
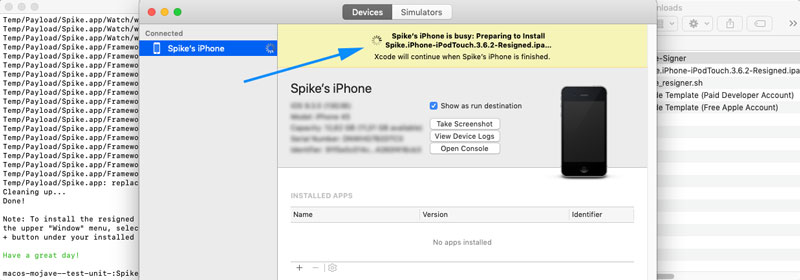
Open Xcode, press the Window upper right menu and select Devices and Simulators.
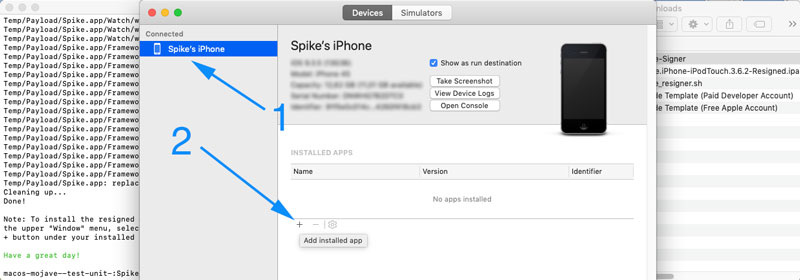
Make sure your device is connected and selected from the list located on the left side of the window (1) and then press the + button at the bottom of your installed apps list (2).
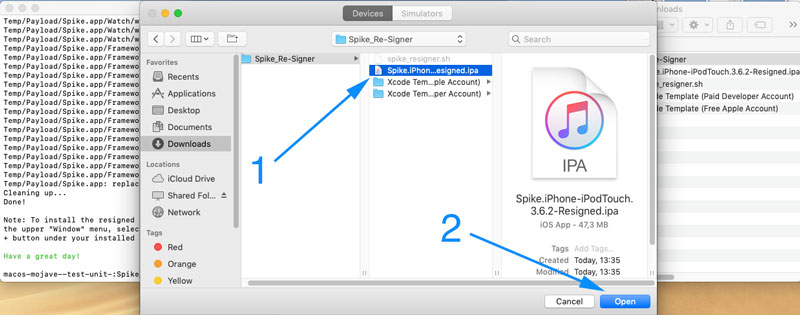
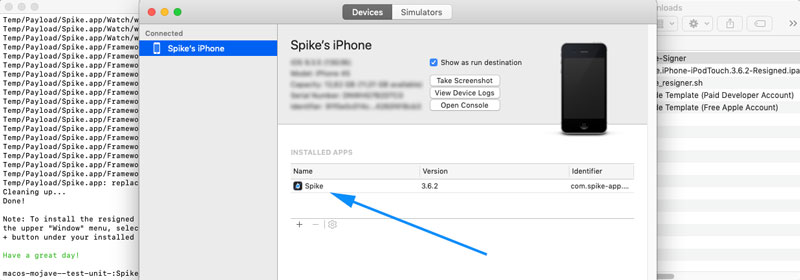
Select your signed Spike ipa file located in the Re-Signer folder and press the Open button.
Xcode will now begin Spike’s installation process. This should not take more than 10-15 seconds to complete.
Once the installation process is complete you’ll see Spike’s icon on your installed apps list. If you can’t see the Spike icon on your home screen, try restarting your device. Once restarted, the icon should appear. If not then swipe down anywhere on your home screen, search for “spike” (without quotes) and open it. The icon should appear afterwards.
If, when opening Spike for the first time, a popup appears stating that the app was signed with an untrusted developer certificate, please go to iOS Settings > General > Profiles & Device Management > [Your Email Address] and press Trust. You should now be able to open and use Spike without any issues.
Re-sign Spike
This is a very important topic so please be sure to give it proper attention.
If you used a free regular Apple iCloud/App Store account to sign and install Spike, the app will be valid for 7 days, if you used a paid Apple Developer account Spike will last 1 entire year.
You can and should avoid expiration in order to have Spike running without any downtime. Before Spike expires you will need to re-sign the ipa file and re-install it on your device. Don’t delete your previously installed copy of Spike, leave it as is and re-install Spike on top of the existing one. This will keep all your data and settings intact and will renew the expiration date. Be sure to use the same Apple account when re-signing Spike.
As long as you re-sign/re-install Spike before it expires, it will run forever. The process should take less than 2 minutes.
The steps are almost identical to the ones described in the Sign Spike section with only one minor difference: When you execute the Re-Signer, on the first question, select YES. This will clear all your Xcode cache.
After Spike clears Xcode’s cache (should take less than 1 second) it will present you with instructions on how to recreate all your certificates.
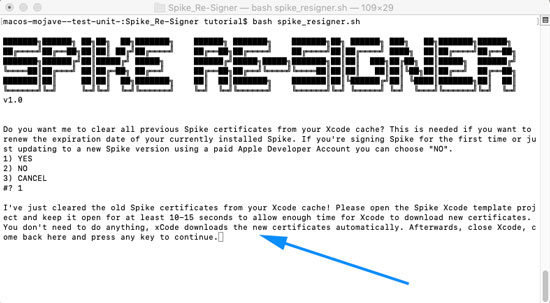
Basically, all you need to do now is leave Terminal open, open the Spike Xcode project and leave it open for 10-15 seconds. You’ll notice that as soon as you open the Xcode project it will automatically start re-downloading your certificates. After 10-15 seconds of having Xcode open you can close it, go back to Terminal and press any key to continue resigning your Spike ipa file with a fresh certificate. Just perform the same steps as described in the Sign Spike and Install Spike On Your iOS Device sections.

You’ll need to perform these steps once a week if you’re using a free regular Apple iCloud/App Store account or once a year if you’re using a paid Apple Developer account, or every time you want to upgrade Spike when a new update is released.
Update Spike
When a new Spike update is released just download the new ipa file from this same page or, better yet, let Spike Re-Signer download it for you automatically and perform the same instructions described in the Re-sign section of this guide.
Register Additional Devices
In order to run Spike on different iOS devices their UDID numbers need to be registered in your account.
Free accounts do not have access to Apple’s Developer Portal so the only way to register devices is by opening Spike’s Xcode template, connecting the device to the computer via USB, selecting the device in Xcode an pressing the Register Device button in the Status section.

The above method also works for paid accounts but an additional method is also available. You can access Apple’s Developer Portal with your paid account credentials and go to Certificates, Identifiers & Profiles > Devices > All > +. Once all devices are added, you’ll need to re-sign Spike and use the clear Xcode cache option in Spike Re-Signer.
Both free and paid accounts can register up to 100 devices of each type (iPhone, iPad, Apple Watch, iPod Touch & Apple TV).
Check Spike’s Expiration
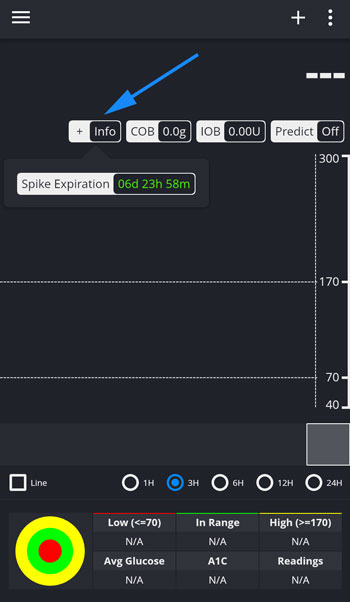
You can check when Spike is going to expire by pressing the Info Pill on the main screen. Spike will also notify you when it’s time to re-sign in order to avoid expiration and downtime.
For free accounts Spike will notify you 24h, 12h and 1h before it expires. It will also notify you after it has expired. If the certificate expires, Spike will continue to run until you close it from the app switcher. Once you close it you will not be able to re-open it again until you re-sign it.
Paid accounts have the same expiration notices plus 2 extra ones: 1 week and 3 days before the app expires.
If you can’t see the Info Pill on your Spike home screen you can activate it by going to Settings > Treatments > Info Pill.
Create A Virtual Mac Environment
Windows and Linux users that don’t own a Mac can still use this signing method by first creating a Mac virtual environment.
The process is quite simple.
Download VirtualBox, VirtualBox Extension Pack & Vagrant (all are free).
Once you have all three installed create a folder anywhere on your computer. This is the folder where we are going to create our virtual environment. We will require about 20Gb so make sure you have enough space on your hard drive.
Open Terminal (or Command Prompt in Windows), navigate to the folder you just created and issue (copy/paste) the following command followed by ENTER on your keyboard:
vagrant init adasilva/Mojave --box-version 1.0
Once the command completes issue (copy/paste) the following command also followed by ENTER on your keyboard:
vagrant up
Vagrant will now download all necessary files (15Gb) to create a virtual environment consisting of MacOS Mojave + Xcode 10 pre-installed and pre-configured (everything you need to sign Spike). Depending on your internet connection speed this can take a while.
Once everything is downloaded and configured you can close the terminal window, open VirtualBox and start your newly created virtual Mac machine. You can then follow the instructions contained in this page to sign and install Spike just like if you were using a real Mac.
Troubleshooting
Can’t Open Spike. It Says “Untrusted Developer”
Please go to iOS Settings > General > Profiles & Device Management > [Your Email Address] and press Trust. You should now be able to open Spike.
Permission Denied Error
Instead of issuing the “bash spike_resigner.sh” command when executing the re-signer, add a sudo before it like this: “sudo bash spike_resigner.sh”. Afterwards, input your Mac password and proceed as normal.
There Are No Devices Registered Error
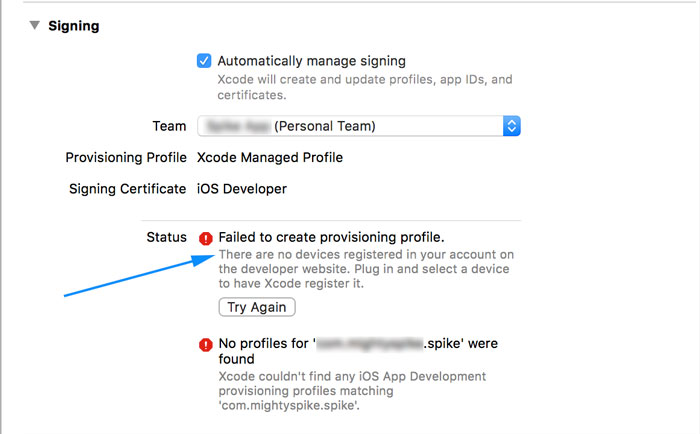
To fix this you need to register at least 1 iOS device with your account. Just make sure your iOS device is connected to your computer and then select it in Xcode like shown in the image below.
Your maximum App ID limit has been reached
This error only happens with free regular Apple iCloud/App Store accounts. Spike needs 5 different App IDs to be created in order to be installed on a device. 1 app id for each of these components: main app, chart today widget, full screen today widget, apple watch app & apple watch extension.
Free Apple accounts may create up to 10 App IDs every 7 days. Your account has reached this limit.
Just go to https://appleid.apple.com and create a new (dummy) fresh account and use it from now on to sign Spike.
A Valid Provisioning Profile For This Executable Was Not Found
This error appears when you try to install Spike on your device using Xcode. It means the device is not yet registered with your account.
Register your device following these steps and then re-sign Spike again. Don’t forget to tell Spike Re-Signer to clear Xcode’s cache in order to force it to re-download new certificates that include the newly registered device.
Afterwards, you should be able to install Spike on your device using Xcode.
Security: SecPolicySetValue: One Or More Parameters Passed To A Function Were Not Valid Warning
This seems to happen on older versions of MacOS and/or Xcode when running Spike Re-Signer in Terminal. This is just a warning and doesn’t affect any functionality. You can ignore it.
Can’t Find Mobileprovision File Error
This can happen due to multiple factors:
- Are you sure you’ve completed all the steps in the Initial Setup section? Don’t forget you need to change the bundle identifier, add a team and configure capabilities for all targets (spike, chartwidget, fullscreenwidget, watch & watch extension). Have in mind that the bundle ids need to look like this:
- Spike: com.whateveryouhavechoseninyourxcode.spike
- Chart Widget: com.whateveryouhavechoseninyourxcode.spike.widget
- Fullscreen Widget: com.whateveryouhavechoseninyourxcode.spike.fswidget
- Watch: com.whateveryouhavechoseninyourxcode.spike.watchkitapp
- Watch Extension: com.whateveryouhavechoseninyourxcode.spike.watchkitapp.watchkitextension
- Did you just ask Spike Re-Signer to clear Xcode’s cache? If so, don’t forget to open Spike’s Xcode project after clearing the cache and leave it open and in the foregroundfor at least 10-15 seconds to allow it to re-download all your certificates. Xcode will do this automatically as long as you leave the project open, no user interaction required. Afterwards, return to Spike Re-Signer and press any key to continue.
- Are you using the same Apple account for both Spike’s Xcode project and Spike Re-Signer? Have in mind that, in Spike Re-Signer, you need to select the same account you used to setup Xcode otherwise it will not be able to find the *.mobileprovision files necessary to sign Spike’s ipa file.
- For some unknown reason, sometimes even selecting the same Apple account in both Terminal and Xcode results in the “can’t find mobile provision error”. If that’s the case you might try opening the Spike Re-Signer file with TextEdit, add a # at the begging of:
- Line 366: if [ “$CODE_SIGN_IDENTITY” = “$MOBILEPROVISION_IDENTITY_NAME” ]; then
- Line 423: fi
- Now save the Re-Signer file in TextEdit and run it again in Terminal.
Xcrun: Error: Invalid Active Developer Path
You need to install developer tools on your computer.
Open a new Terminal window and enter the following command followed by ENTER on your keyboard:
xcode-select –install
Follow the prompts and once the installation is complete go back to the re-signer and run it again.
This Application’s Application-Identifier Entitlement Does Not Match That Of The Installed Application.
This error appears in Xcode when you try to install Spike on your device. It means you already have an old copy or Spike already installed or a copy that was signed with a different Apple account.
You need to first uninstall the old Spike before installing the newly re-signed one.
Ambiguous Error

If you encounter this error while running the Spike Re-Signer it means you have a duplicate entry for your Apple account in your Keychain. This can be easily fixed by opening the Keychain app, going to the Certificates section and deleting all entries for your account.
Afterwards, open the Spike Xcode project and wait 10-15 seconds to allow Xcode to repair and re-add your account to the keychain. You can now run the Spike Re-Signer again.
Any Other Error
- Make sure you’ve executed correctly ALL steps in the Initial Setup section.
- Execute Spike Re-Signer and choose YES on the first question (clear Xcode cache).
- Follow the on-screen instruction in Terminal.
If you need any further support, please join our Facebook support group here.