
Index
- Before You Start
- Things To Keep In Mind
- Method Highlights
- Difficulty Level
- Time Required
- Supporting Materials
- Downloads
- Install ReProvision
- Re-sign Spike
- Update Spike Manually
- Update Spike Using Shortcuts
- Check Spike’s Expiration
- Troubleshooting
Before You Start
- Important: This manual or parts of it may no longer be up to date and will be revised. In the meantime, the Facebook group should be used as a source of information. Thanks for your understanding.
Things To Keep In Mind
- When installing Spike using your own certificate, Spike will stop working if/when the certificate expires.
- To avoid Spike from stopping to work, your certificate needs to be renewed/re-signed before it expires.
- When signing Spike using a free regular Apple iCloud/App Store account, your certificate will last for 7 days. When doing it using a paid Apple Developer account, the certificate will last 1 year.
- You don’t need to use your personal Apple account to sign Spike, although you can. A dummy account can be created in just a few minutes by going to https://appleid.apple.com. Make sure you always use the same account to sign and re-sign Spike if you want to keep your data and settings between re-installs.
- If you still have an old version of Spike installed on your iOS device and want to migrate all your data and settings, please follow this guide first and then come back here.
- If you experience any issues be sure to read the Troubleshooting section. If the solution is not there you should join our Facebook group.
Method Highlights
- No PC required to install and re-sign Spike. Everything is done directly from your device using an app called ReProvision.
- No need to manually re-sign Spike to avoid expiration, your device will do it automatically. Just install and forget.
- Enjoy all Spike features except iCloud database backups/restores. You can still backup/restore your database by sending a copy to your e-mail address (Spike Settings > Maintenance > Database Backup/Restore > Send Database) and restoring by sending the database file from your e-mail to Spike, by using the Files app on your device (iOS 11+) or by connecting your device to a computer and using iTunes File Sharing.
- If your device is eligible for a jailbreak, this is by far the most recommended install method. It doesn’t require any maintenance.
Difficulty Level
- Easy.
Time Required
- 5-15 minutes.
- If your device is already jailbroken, this guide should take about 5 minutes to complete.
- If you first need to jailbreak your device, please check the links in the Supporting Materials section. Jailbreaking your device should take about 10 minutes.
Supporting Materials
- Can I Jailbreak? – Check if your device is eligible for jailbreak.
- How To Jailbreak – Everything about jailbreaks and how-to guides.
Downloads
- Spike (Required. Latest Version)
- Update Shortcut (Optional)
Install ReProvision
In order to install Spike and re-sign it automatically we will use a jailbreak app called ReProvision. To install it on your jailbroken device, open the Cydia app.
If this is the first time you’ve opened Cydia it will probably ask you to upgrade some packages after it’s done refreshing its sources. If that’s the case, press the Complete Upgrade button, otherwise skip the next 3 steps.
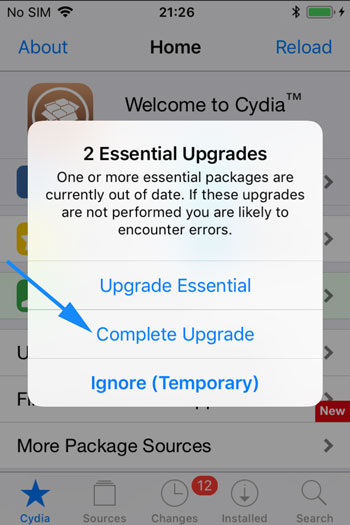
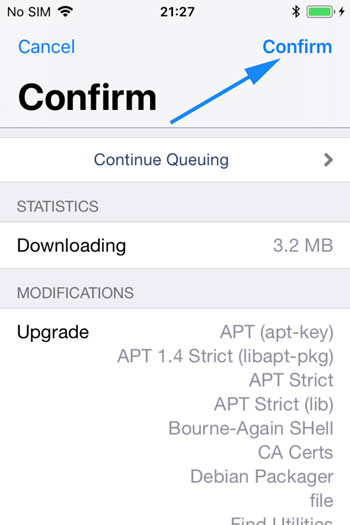
Press the Confirm button located at the upper-right corner of the screen.
After Cydia finishes installing all packages press the button located at the bottom of the screen. This button can read one of several things:
- Return to Cydia: After you press this button you will return to Cydia and can proceed with the next steps.
- Restart SpringBoard: After you press it the entire user interface will refresh. You will then need to unlock your phone again and re-open Cydia before proceeding with the next steps.
- Close Cydia: After pressing it Cydia will close and you will return to the home screen. Re-open Cydia and continue with the next steps.

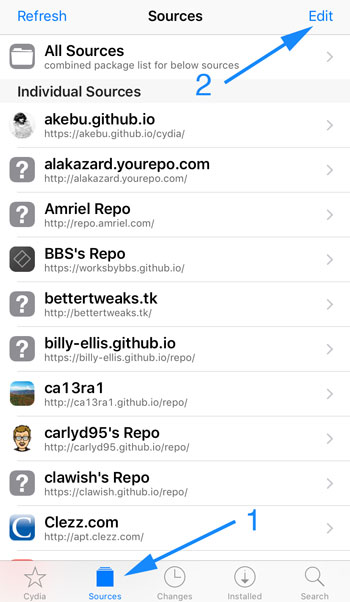
Now that all Cydia maintenance is done, go to the Sources tab and press the Edit button located at the top-right corner of the screen.
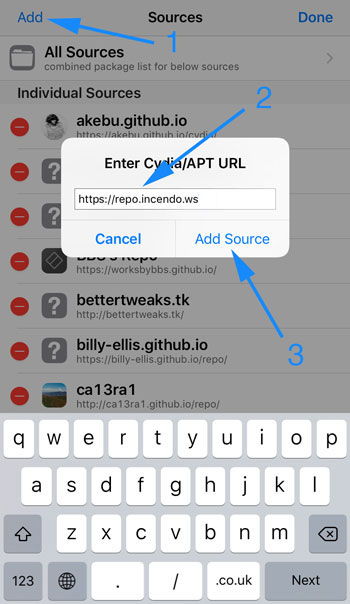
Press the Add button located at the top-left corner and write the following URL in the popup’s text field: https://repo.incendo.ws (have in mind the URL needs to start with https and not http)
Afterwards, press the Add Source button.
Cydia will show you a black screen and will refresh all sources. When it’s finished, please press the Return to Cydia button at the bottom of the screen.

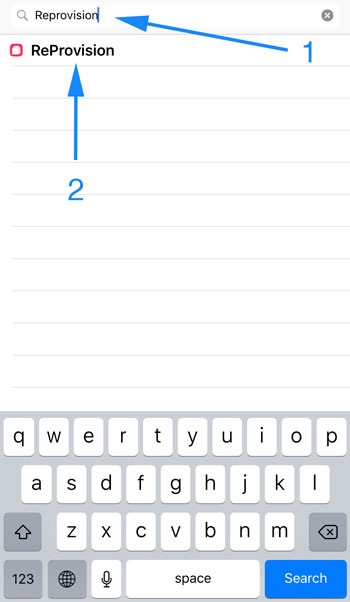
Now go to the Search tab located at the lower-right corner, search for ReProvision and press on the ReProvision search result.
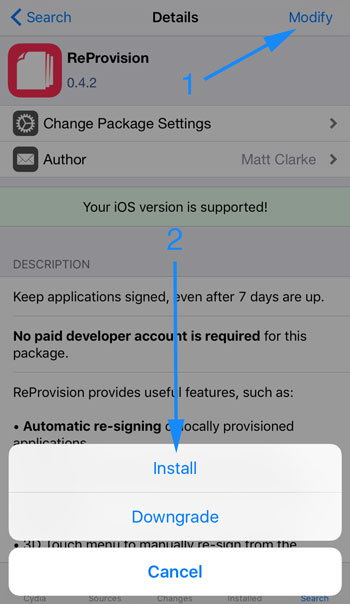
You will be taken to the ReProvision depiction page. To install the app, please press the Modify button located at the top-right corner and then the Install option that will appear at the bottom of the screen.
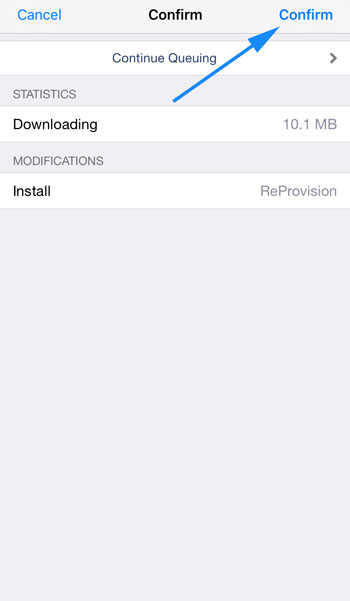
Press the Confirm button on the next screen to proceed with the installation.
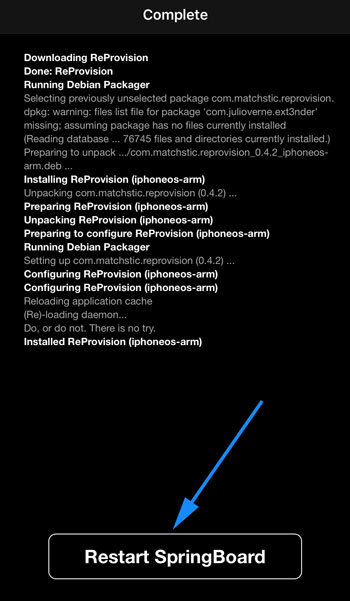
Cydia will now begin installing ReProvision. After the installation is finished, press the Restart SpringBoard button. The graphic interface will now reload.
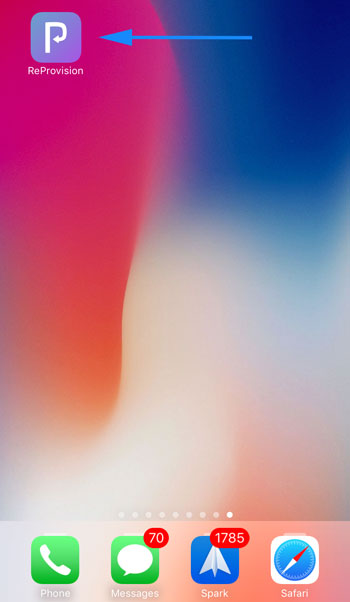
Unlock your device and find the ReProvision icon on your home screen. Press it to open ReProvision.
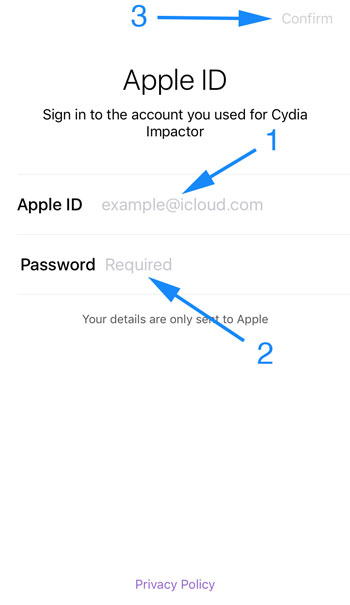
The app will now prompt you for the username and password of an Apple account. This is the account that will be used to digitally sign Spike. You can use your own iCloud/App Store account or create a new one in a few minutes just for Spike here. ReProvision also supports paid Apple Developer accounts. As stated at the top of this guide, a free account provides certificates that are valid for 7 days while a paid account provides certificates that last an entire year. When a certificate expires, Spike stops working. Because ReProvision will constantly check the status of your certificate and re-sign Spike 2 days before the certificate expires, Spike will never expire so there’s no real advantage in using a paid Apple Developer account with ReProvision.
Please enter your username and password. Afterwards press the Confirm button.
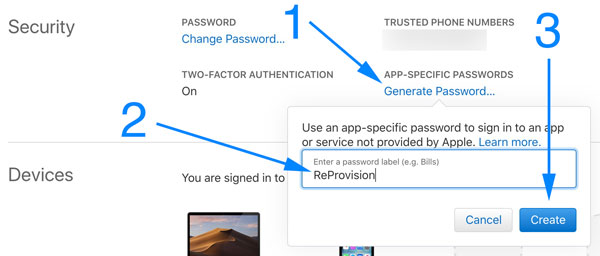
After you’ve pressed the Confirm button, if by any chance you’re presented with the following screen it means your Apple account is protected with 2-Factor Authentication. If ReProvision doesn’t show you this screen please skip the next 2 steps.
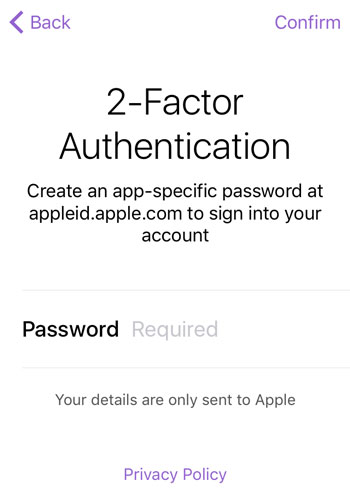
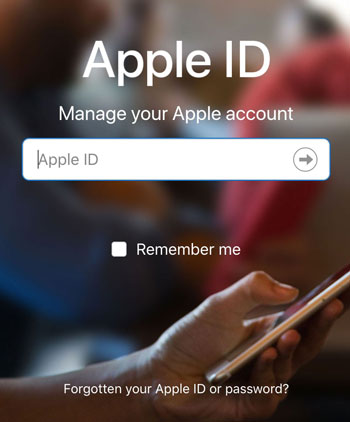
In that case, please head over to https://appleid.apple.com and login with the same Apple account you’ve used in ReProvision.
Under the Security section create a new app-specific password and add it to ReProvision.
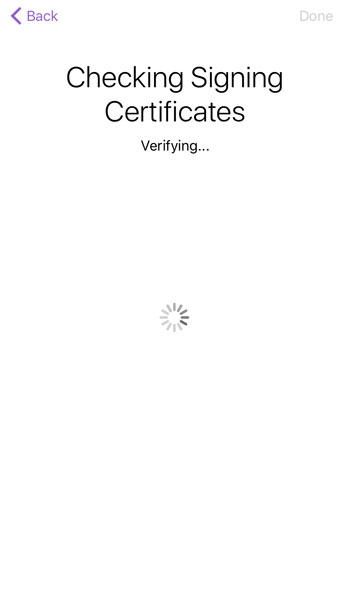
ReProvision will now verify your certificates. This will take a few seconds as it connects and sends your details to Apple’s signing servers.
While paid Apple Developer accounts can have many signing certificates, free accounts can only have 2 active certificates at a time. If your Apple account doesn’t have any free slots for a new signing certificate, ReProvision will notify you and allow you to delete an existing certificate. Please do so.
If you created a free Apple account just for ReProvision, chances are you will not have any active certificates and this screen will not be shown.

The initial ReProvision configuration should now complete successfully.

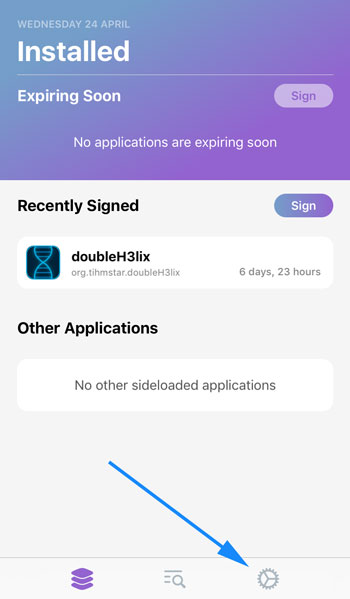
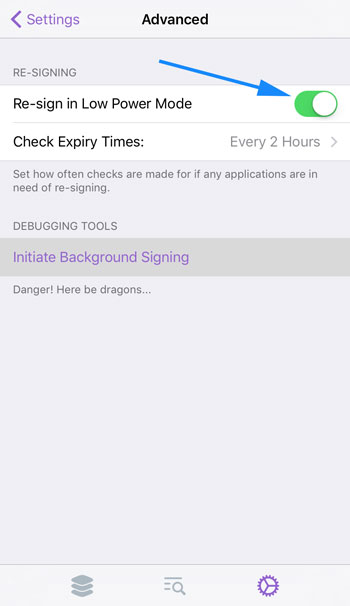
The next step is to allow ReProvision to work even when your phone is in low power mode. Because Spike is an essential app that you’ll need to rely on 24/7, it’s a good idea to activate this setting to make sure Spike will never expire. Please go to the Settings tab.
Now go to the Advanced section.
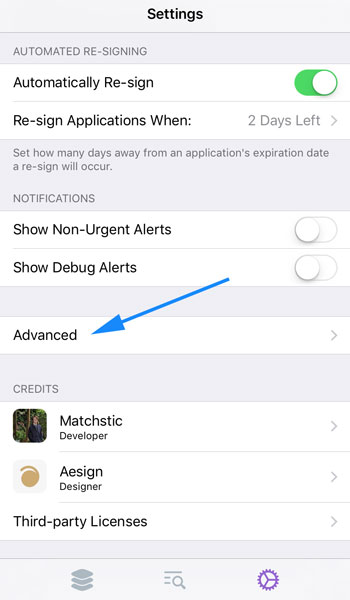
Finally, activate the Re-sign in Low Power Mode option.
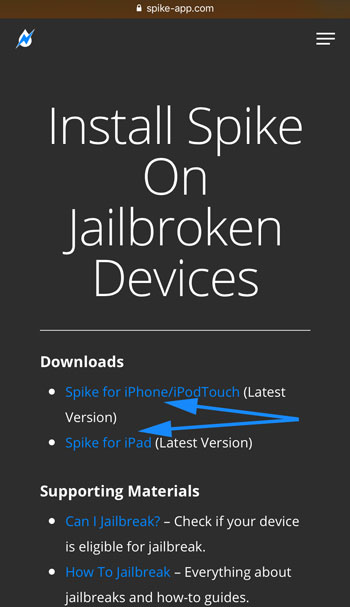
We’re now ready to install Spike. Minimize ReProvision and open Safari on your device. Navigate to this page we are right now and at the top, in the Downloads section, press on the Spike version you wish to install (iPhone-iPodTouch or iPad).
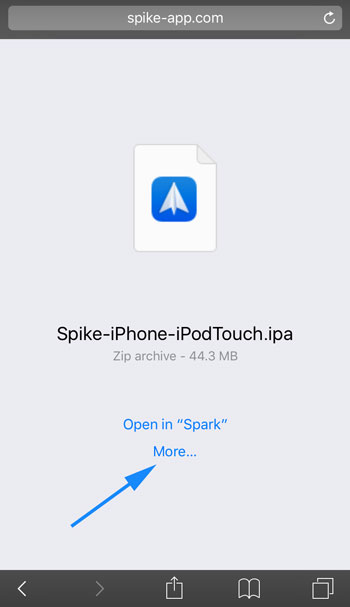
Safari will now start the download process and will present you with a screen similar to the one below once it’s finished. Have in mind that, depending on your internet connection speed, it might take a few minutes for the download to complete. Once the download is completed press on the More button.
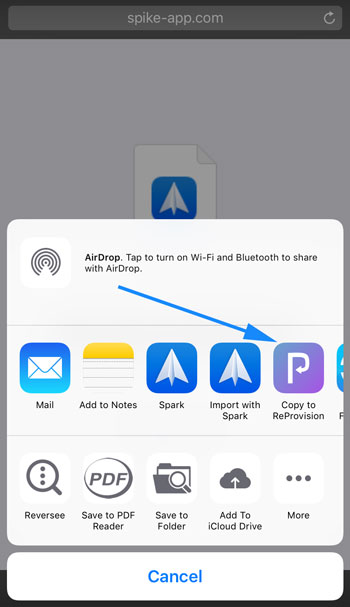
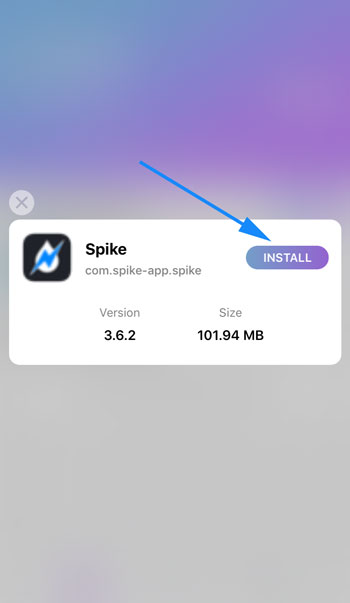
Now press the Copy to ReProvision option. This will send the Spike installation file (ipa) to ReProvision.
ReProvision will now open. Press the Install button to sign and install Spike using your Apple account. Have in mind that this process might fail, if it does you’ll need to try it a few times until it succedes. You might want to take a look at the Troubleshooting section, especially this sub-section.
If you have an Apple Watch, make sure it’s connected to your phone during the installation process so ReProvision can correctly sign Spike’s Apple Watch app as well.
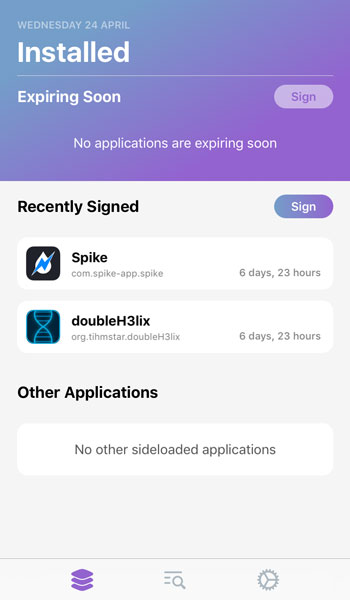
Once Spike is installed, ReProvision will automatically keep it signed forever, without any maintenance on your part.
You may now close ReProvision and start using Spike! If you can’t see the icon, try restarting your device. Once restarted, the icon should be there on your home screen. If not then swipe down anywhere on your home, screen search for “spike” (without quotes) and open it. The icon should appear afterwards.
If, when opening Spike for the first time, a popup appears stating that the app was signed with an untrusted developer certificate, please go to iOS Settings > General > Profiles & Device Management > [Your Email Address] and press Trust. You should now be able to open and use Spike without any issues.
Note: It’s important to note that you must always use your device in jailbroken mode to allow ReProvision to monitor and re-sign Spike when needed (you don’t need to open ReProvision, it does all this in the background, automatically). This can only happen when you’re in a jailbroken state. If by any chance you reboot your device just make sure you go straight into jailbroken mode again. You can also use ReProvision to keep your jailbreak app (Unc0ver, Electra, etc.) always signed, just as you’re doing with Spike.
If you’re facing any issues with ReProvision, please be sure to read the Troubleshooting section.
Re-sign Spike
There’s no re-sign maintenance, as long as you use your device always in jailbroken state, ReProvision will keep Spike signed. When ReProvision determines Spike is about to expire, it will re-sign Spike and notify you. It’s possible that ReProvision will need to close Spike before it re-signs it again so every time you get a notification saying that Spike has been re-signed please make sure Spike is still running, if it’s not, just open it by pressing its icon on the home screen.
Update Spike Manually
When a new Spike update is available just redo the installation steps to install the new version using ReProvision. You can achieve this by following this same guide from this step onwards. Don’t delete your already installed Spike, just install the new Spike on top of the old one. This will ensure you will keep all your settings & data after the update is completed.
Update Spike Using Shortcuts
Jailbroken users can update Spike with a press of a button or by asking Siri. To achieve this we will use the Shortcuts/Workflow app and a custom made shortcut.
Please download and install the Shortcuts/Workflow app. A link can be found in the Downloads section.
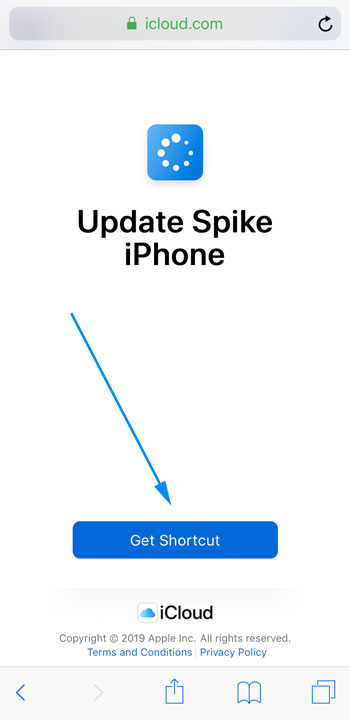
Once the app is installed please visit this page using Safari on your iOS device. In the Downloads section you’ll find a shortcut for the iPhone/iPodTouch version and another one for iPad. Press the desired shortcut and you will be taken to the shortcut depiction page. On that page press the Get Shortcut button to download and import the shortcut to your iOS device.
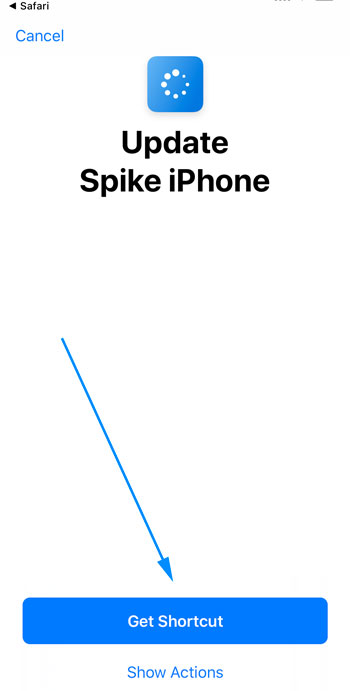
The Shortcuts/Workflow app will open and you’ll have to press the Get Shortcut button once again.
Now press the settings button at the upper-right corner of the screen.
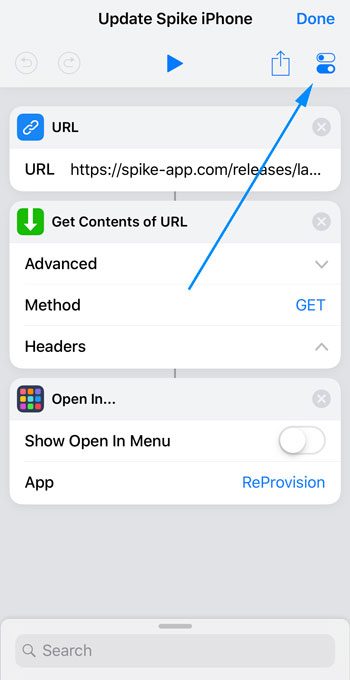
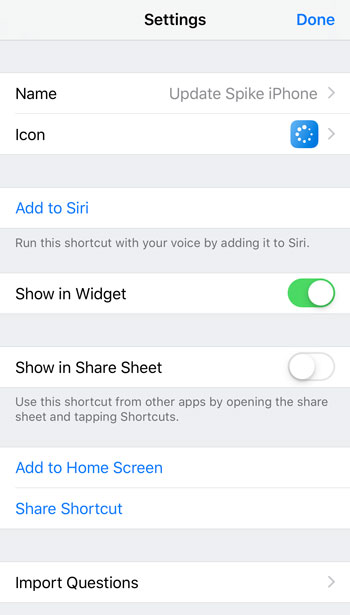
Here you can add the shortcut as a widget in the Today View, add it to Siri in case you want to record a sentence that will automatically trigger the shortcut on demand or even add it as an icon on your home screen. Once you’ve tweaked your settings press, twice, the Done button at the upper-right corner.
Every time you get an in-app popup in Spike notifying you of a new update you can run the shortcut. Your phone will automatically download the updated ipa file and send it to ReProvision so you can install it.
Check Spike’s Expiration
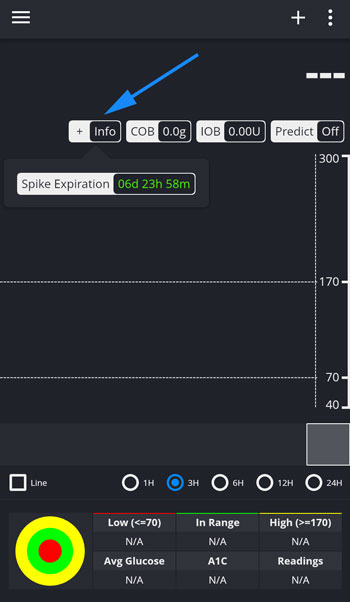
You can check when Spike is going to expire by pressing the Info Pill on the main screen. This is for informational purposes only, ReProvision will re-sign Spike 2 days before it expires and will extended the expiration for 7 more days if using a free account or 1 year if using a paid account.
If you can’t see the Info Pill on your Spike home screen you can activate it by going to Settings > Treatments > Info Pill.
Troubleshooting
Although you should hardly experience errors or glitches, the “Troubleshooting” section inside ReProvision will easily let you fix any error that may crop up. You can access this section by pressing the middle tab at the bottom of the screen.
Can’t Open Spike. It Says “Untrusted Developer”
Please go to iOS Settings > General > Profiles & Device Management > [Your Email Address] and press Trust. You should now be able to open Spike.
ReProvision Crashes Or Doesn’t Install Spike
Just try again a few times. Eventually it will get through. This might happen only when installing Spike the first time. All should run smoothly when automatically re-signing Spike afterwards.
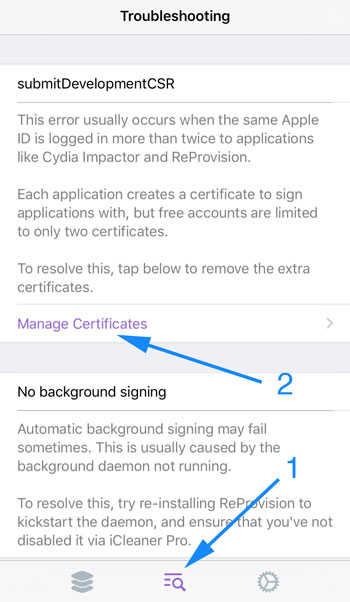
Closing ReProvision from the app switcher and/or revoking your certificates (Troubleshooting section inside ReProvision and then go to Manage Certificates ) in between install attempts might help as well. Also take a look at the submitDevelopmentCSR Error section, it provides important tips.
submitDevelopmentCSR Error
This is a very common error, especially if it’s the first time you’re trying to install Spike on your phone.
Please try the following suggestions, one by one, at least 3-5 times each… Only move onto the next step if the previous one didn’t fix your issue. Once you’re able to install Spike you don’t need to continue following any more suggestions.
- Please head over to the Troubleshooting section inside ReProvision (look at picture in the bottom of this sub-section), then go to Manage Certificates and delete/revoke all your certificates. Close ReProvision from the app switcher. Go to Safari once again and send Spike’s ipa file to ReProvision. Press “Install”. Try this at least 3-5 times before going to the next suggestion.
- Close ReProvision from the app switcher but DON’T delete/revoke any certificates. Go to Safari once again and send Spike’s ipa file to ReProvision. Press “Install”.Try this at least 3-5 times before going to the next suggestion.
- There might be an issue with your Apple account. Try to create a new one by going to https://appleid.apple.com and start over with ReProvision.
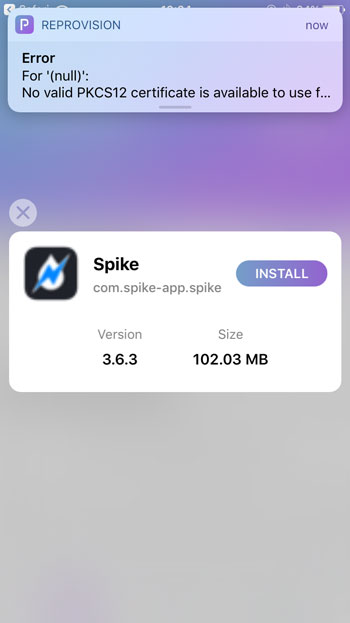
No Valid PKCS12 Certificate Error
This error is very similar in nature to the submitDevelopmentCSR error. Please try the exact same steps posted above.
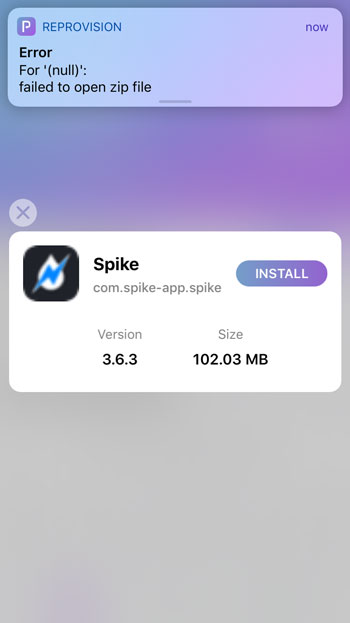
Failed To Open Zip File
ReProvision shows this error if it failed to install Spike and you pressed the Install button a second time. Once ReProvision fails to install Spike you need to go back to Safari and send the ipa file back to ReProvision.
Your maximum App ID limit has been reached
This error only occurs with free regular Apple iCloud/App Store accounts. Spike needs 5 different App IDs to be created in order to be installed on a device. 1 app id for each of these components: main app, chart today widget, full screen today widget, apple watch app & apple watch extension.
Free Apple accounts may create up to 10 App IDs every 7 days. Your account has reached this limit.
Just go to https://appleid.apple.com and create a new (dummy) fresh account and use it from now on to sign Spike.
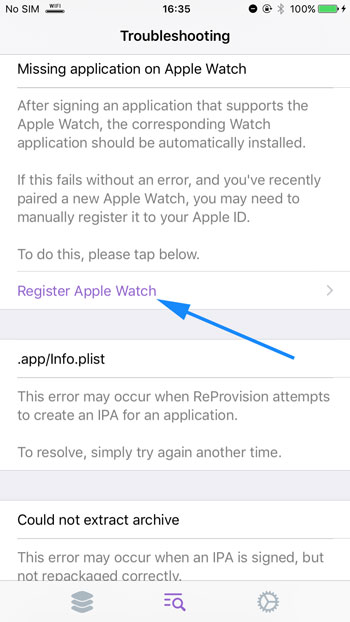
Spike Is Not Installing On My Apple Watch
Make sure your Apple Watch is paired with your device, then head over to the Troubleshooting section in ReProvision and press the Register Apple Watch option. Afterwards, go back to the main section, press on Spike’s icon and select Sign. This will re-sign Spike with a certificate that includes your Apple Watch.
When the resigning process is complete, just open the Watch app on your home screen and install Spike on your watch.
If you need any further support, please join our Facebook support group here.